 Save to Pinterest
 Last summer, a friend handed me a tiny jar of homemade limoncello at a dinner party, and I stood in her kitchen wondering how to use it beyond sipping it straight. She mentioned offhandedly that it would be perfect in a cheesecake, and suddenly I was imagining something bright and creamy, no oven required. These little jars became my answer to that moment—a way to capture sunshine in every spoonful without heating up the kitchen on a hot afternoon.
I made these for a friend's garden party in July, and watching people's faces light up when they got that first taste of the bright, zesty filling was worth every minute of prep. Someone asked if I'd studied pastry professionally, which made me laugh—I was literally just layering things in jars that afternoon while sitting on the porch with an iced coffee.
Ingredients
- Digestive biscuits (150g), finely crushed: These are sturdier than you'd think once crushed and mixed with butter, creating a base that holds its own against the creamy layers above.
- Unsalted butter (60g), melted: Melted butter binds everything together; melting it first rather than softening makes the mixture come together faster and more evenly.
- Granulated sugar (1 tbsp): Just a touch of sugar adds sweetness and helps the biscuits toast slightly, giving them more depth.
- Cream cheese (300g), room temperature: Room temperature is not negotiable here—cold cream cheese will clump and create a lumpy filling that no amount of beating will fix.
- Mascarpone cheese (150g): Mascarpone adds a silky, luxurious texture that cream cheese alone can't achieve; it's the secret to making this taste restaurant-quality.
- Powdered sugar (80g): Powdered sugar dissolves more smoothly than granulated, keeping the filling perfectly creamy.
- Limoncello liqueur (60ml): This Italian liqueur is what makes the whole thing sing; it's bright, boozy, and unmistakably lemon without being harsh.
- Vanilla extract (1 tsp): Vanilla rounds out the lemon's sharpness and adds a whisper of warmth.
- Lemon zest (from 1 lemon): Fresh zest adds texture and intensifies the lemon flavor so each spoonful tastes like you're eating sunshine.
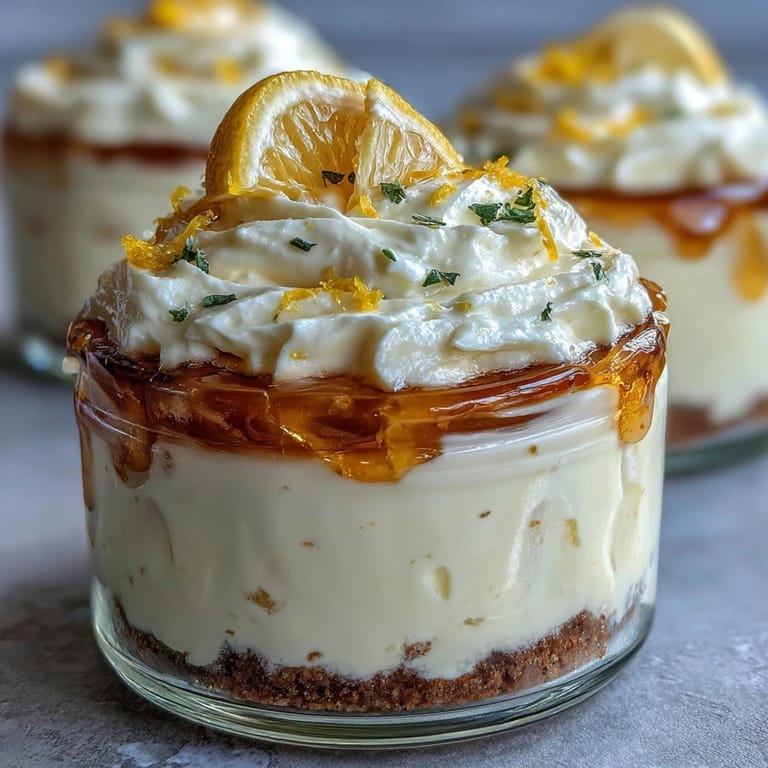
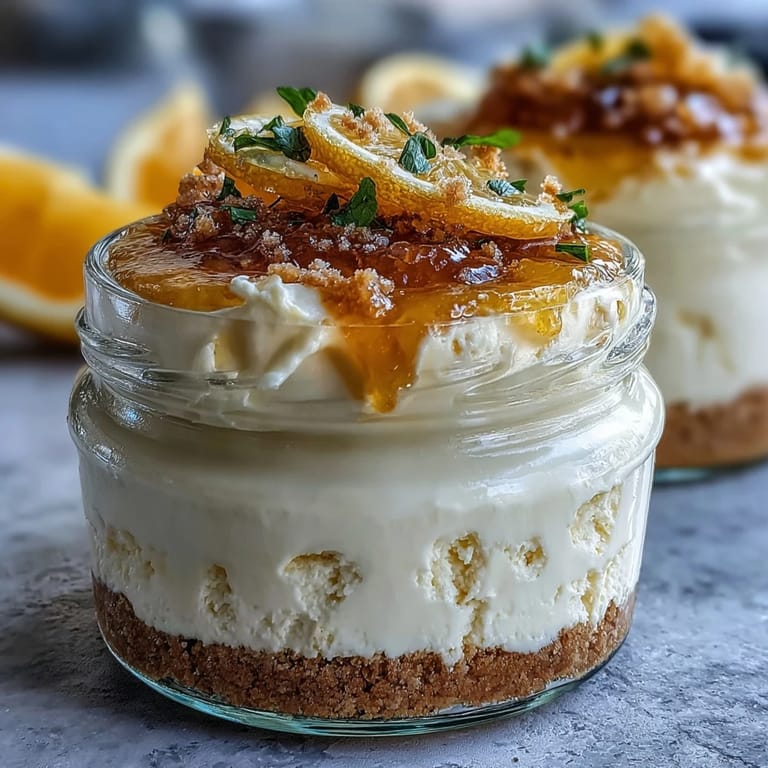
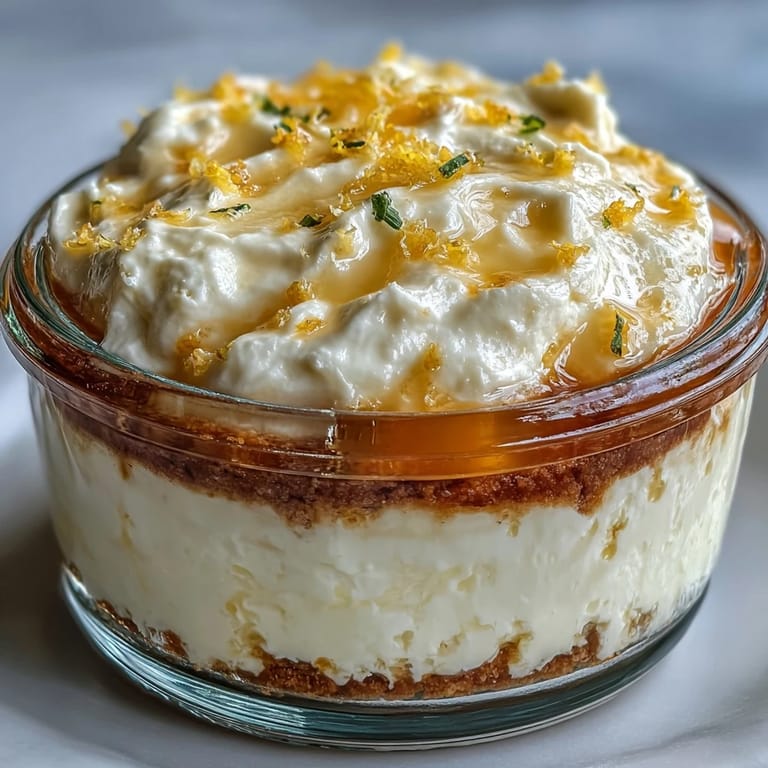
- Lemon curd (120g): Lemon curd on top creates a beautiful color and adds that perfect tang that cuts through the richness of the cheesecake.
Tired of Takeout? 🥡
Get 10 meals you can make faster than delivery arrives. Seriously.
One email. No spam. Unsubscribe anytime.
Instructions
- Crush and mix your biscuit base:
- In a bowl, combine the crushed biscuits with melted butter and a tablespoon of sugar, stirring until the mixture looks like wet sand with no dry crumbs left behind. The butter should coat everything evenly, so you can squeeze a handful and it holds together.
- Press it firmly into the jars:
- Divide the biscuit mixture evenly among your six jars, pressing down hard with the back of a spoon so the base is compact and won't shift when you layer the cheesecake on top. A sturdy base is what keeps these jars elegant instead of messy.
- Beat the cheese mixture until fluffy:
- In a large bowl, whip the room-temperature cream cheese, mascarpone, and powdered sugar together for about two minutes until the mixture is completely smooth and has no lumps. If you see any clumps, keep beating; they're your enemy here.
- Blend in the limoncello and zest:
- Add the limoncello, vanilla extract, and lemon zest, then beat again for about a minute until everything is combined and the mixture looks light and slightly fluffy. The zest will give it a speckled, homemade appearance that no store-bought version can match.
- Layer the cheesecake over the biscuits:
- Spoon or pipe the cheesecake mixture over each biscuit base, dividing it evenly so each jar gets its share, then smooth the tops with a spatula. You want the surface relatively flat so the lemon curd sits nicely on top.
- Top with lemon curd:
- Add two to three teaspoons of lemon curd to the top of each jar, spreading it gently so it covers most of the cheesecake. The golden color is half the appeal.
- Chill for at least two hours:
- Refrigerate the jars until the filling is completely set and cold—this usually takes around two hours, though leaving them overnight only makes them better.
- Garnish and serve:
- Just before serving, top with fresh berries and a sprinkle of extra lemon zest if you're feeling fancy, but honestly, they're perfect as is.
 Save to Pinterest
 The best part about these jars is how they feel like a celebration even though you made them in twenty minutes without turning on your oven. A few summers later, I still bring them to gatherings, and they're always the first dessert to disappear from the table.
Why These Jars Are So Clever
Individual jars mean everyone gets a perfect portion without you having to slice and serve, which honestly feels like magic when you're hosting. They also look sophisticated enough to pass around without anyone realizing you made them while wearing flip-flops on a Tuesday afternoon.
Making Them Ahead of Time
These are the ultimate make-ahead dessert because they actually taste better after sitting in the refrigerator overnight—the flavors meld together and the biscuit base softens just enough to feel tender without falling apart. I've made them three days before an event and they were still pristine, which is more than I can say for most no-bake desserts I've attempted.
Playing Around With Flavors
Once you understand the basic formula, you can swap almost anything for the limoncello depending on what you're craving or what's in your liquor cabinet. I've made versions with orange liqueur, raspberry vodka, and once with a splash of coffee liqueur that honestly had no business being as good as it was.
- For a non-alcoholic version, replace the limoncello with fresh lemon juice and extra zest to keep the brightness intact.
- If you can't find digestive biscuits, shortbread or graham crackers work beautifully and sometimes taste even better.
- Homemade lemon curd is wonderful if you have time, but store-bought works perfectly and nobody will know the difference.
 Save to Pinterest
 These little jars have become my go-to when I want to impress without stress, and honestly, that's the whole point of cooking. They taste like summer feels, bright and uncomplicated and exactly what you needed without knowing it.
Recipe FAQs
- → Can I make these jars ahead of time?
Yes, they can be prepared up to two days in advance and kept refrigerated until ready to serve.
- → What can replace digestive biscuits in the base?
Graham crackers or shortbread cookies work well as alternatives for a buttery, crumbly base.
- → Is there a non-alcoholic alternative for Limoncello?
Substitute Limoncello with fresh lemon juice and add extra lemon zest for a similar bright flavor without alcohol.
- → How should the jars be chilled?
Refrigerate for at least two hours to allow the cheesecake layer to firm up properly.
- → What garnishes complement these jars?
Fresh berries and additional lemon zest enhance both the look and the citrusy flavor of the dessert.