 Save to Pinterest
 My daughter insisted on making these Easter Bunny Dirt Cups last spring, and I have to say, watching her face light up as she crushed those cookies was worth every crumb that ended up on the kitchen floor. She was five then, convinced that real dirt belonged in desserts, and who was I to argue when the result was this delightful no-bake creation that kids genuinely get excited about making and eating? The best part is there's zero baking involved, which means you can pull these together while your kids are still awake and actually participate in the magic.
When my nephew's friend asked if we could make something "fun but not babyish" for the Easter party, I prepped these cups in the kitchen while the kids decorated them with Peeps and candy eggs out at the patio table. By the time everyone took their first spoonful, that skeptical eight-year-old was scraping the bottom of his cup and asking for seconds, which honestly felt like winning the lottery in parenting currency.
Ingredients
- Cold whole milk: This needs to be genuinely cold so the pudding thickens properly without lumps—take it straight from the fridge and don't let it sit on the counter.
- Instant chocolate pudding mix: The reliable shortcut that transforms two simple ingredients into silky chocolate goodness in minutes.
- Chocolate sandwich cookies: Oreos work beautifully, but any similar cookie gets the job done; the crushing part is honestly the most fun anyway.
- Whipped topping: Cool Whip from the freezer section saves you from having to whip cream, though homemade whipped cream tastes richer if you have five extra minutes.
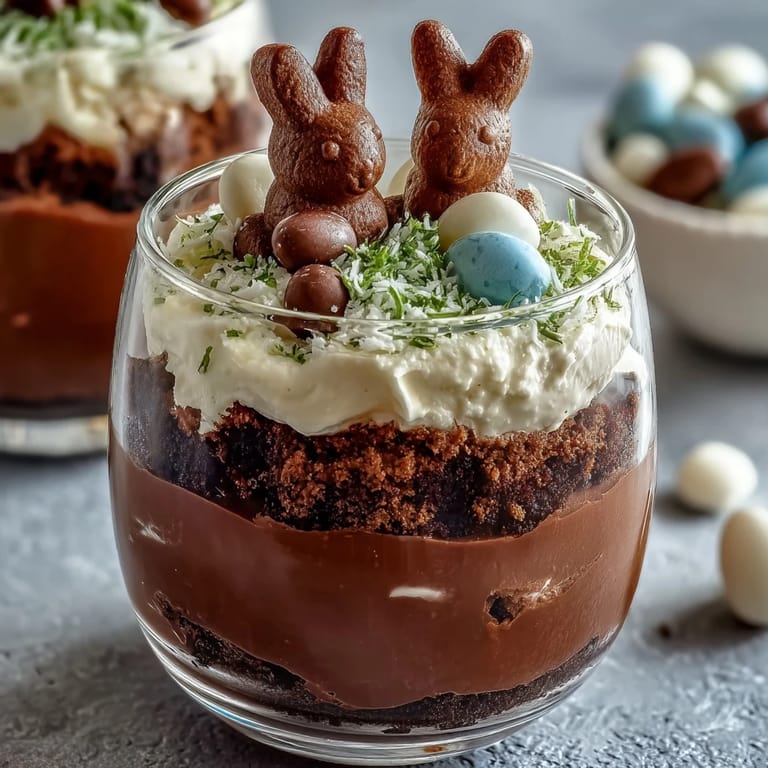
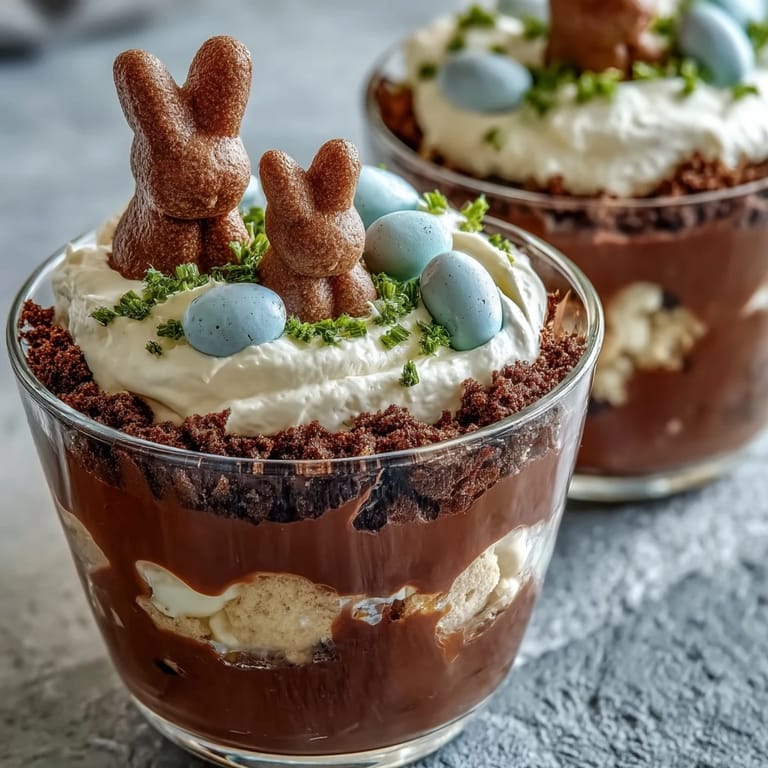
- Marshmallow bunny Peeps: These are the star of the show and the main reason kids get excited; they stand up perfectly in the layers and become the reward for eating down to them.
- Candy-coated chocolate eggs: Mini versions work best since they don't overwhelm the cup, and their bright colors make the whole thing feel like Easter morning.
- Green-tinted shredded coconut: This optional layer creates that grass effect that makes the bunny look like it's actually sitting in a garden instead of chocolate.
Tired of Takeout? 🥡
Get 10 meals you can make faster than delivery arrives. Seriously.
One email. No spam. Unsubscribe anytime.
Instructions
- Whisk the pudding base:
- Pour your cold milk into a bowl and add the pudding mix, then whisk for about two minutes until it thickens up nicely. Let it sit for another five minutes while you crush the cookies—you'll feel it get thicker as the starches do their thing.
- Crush those cookies into dirt:
- Throw your cookies into a zip-top bag and go at them with a rolling pin until they're fine crumbs but still have some little chunks for texture. This step is basically an invitation for anyone in the house to help, and they'll be entertained for several minutes.
- Layer the pudding:
- Spoon about a quarter cup of the thickened pudding into the bottom of each cup, creating a smooth chocolate foundation.
- Add the creamy layer:
- Dollop a heaping tablespoon of whipped topping over the pudding in each cup and smooth it out gently with the back of your spoon, creating a cloud-like middle layer.
- Sprinkle the dirt:
- Scatter two to three tablespoons of your crushed cookies over the whipped topping, pressing gently so they stick in the cream rather than falling straight to the bottom. This is where it starts looking like actual edible dirt.
- Plant your bunny:
- Gently push each marshmallow bunny into the cookie layer so it stands upright like it's sitting in a little garden. They'll nestle in naturally and stay put.
- Decorate with eggs and grass:
- Scatter a few candy eggs around the bunny and sprinkle green-tinted coconut to look like spring grass if you want that finishing-touch magic. Skip this step if your crowd prefers simplicity, but the grass really does make it feel Easter-ready.
- Chill or serve immediately:
- These are ready to eat right now, but you can refrigerate them for a few hours if you're prepping ahead. The pudding stays creamy and the cookies don't get soggy for quite a while.
 Save to Pinterest
 There's something genuinely special about watching someone's eyes go wide when they realize the bunny decoration is actually marshmallow and perfectly edible, not just a cute garnish. That moment of delicious surprise—combined with the satisfaction of peeling away layers to discover each texture—is why this simple dessert has become a request at every Easter gathering in my kitchen.
Variations That Keep Things Fresh
Once you nail the basic formula, you can swap in different cookie types to change the whole vibe; chocolate chip cookies create a different crumb texture, and vanilla wafers lean toward a lighter taste that some people actually prefer. The beauty of this recipe is that it's genuinely forgiving—different candies, different cookies, even different pudding flavors all work beautifully within this same layering structure.
Timing and Make-Ahead Strategy
The actual hands-on time is genuinely just fifteen minutes, which means you could theoretically make these while your oven is being used for the main course, solving the Easter dinner logistics puzzle. I've assembled them up to four hours ahead of serving, stored them in the refrigerator loosely covered, and they've held up perfectly without any texture degradation or flavor loss.
Why This Works for Every Crowd
This recipe bridges that weird gap where some kids think fancy desserts are boring but others get overwhelmed by super involved recipes, somehow appealing to both camps. There's something about the combination of chocolate, crunch, and cream that feels indulgent while the bunny and candy decorations keep it playful and seasonal.
- Adults appreciate the layered textures and actually-good chocolate flavor just as much as kids do.
- The no-bake nature means you can make these while managing everything else during a holiday meal without stress.
- They look special enough to serve at a gathering but simple enough that even a seven-year-old can help create them without frustration.
 Save to Pinterest
 These cups prove that holiday desserts don't need to be complicated to feel special, and they've genuinely become the dessert that gets requested by name at spring celebrations. Make them once and you'll understand why they've become a tradition in so many households.
Recipe FAQs
- → How long does it take to prepare these cups?
The preparation takes about 15 minutes with no baking required, making it a quick and easy treat.
- → Can I use homemade whipped cream instead of store-bought topping?
Yes, homemade whipped cream can be used as a substitute for the whipped topping to enhance freshness.
- → What cookies work best for the crumble layer?
Chocolate sandwich cookies like Oreos provide a crunchy and flavorful base for the crumble.
- → Are there nut-free options for this dessert?
Ensure cookies and candy decorations are processed in nut-free facilities to keep this treat nut-free.
- → How can I make the decoration look like grass?
Sprinkling green-tinted shredded coconut around the marshmallow bunnies creates a grass-like effect.
- → Can I prepare this dessert ahead of time?
Yes, assembling the cups in advance and refrigerating them keeps the layers fresh until serving.