 Save to Pinterest
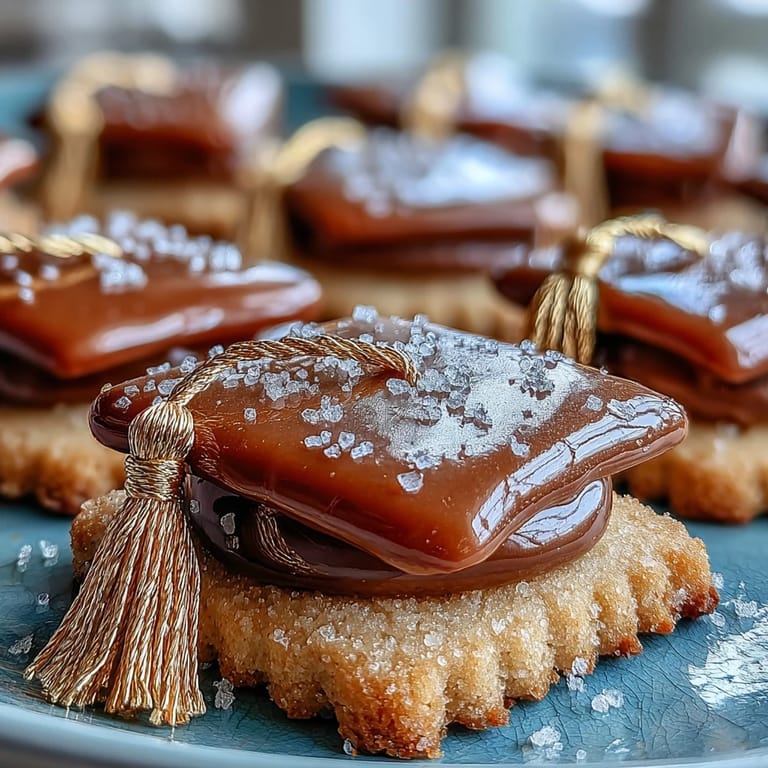
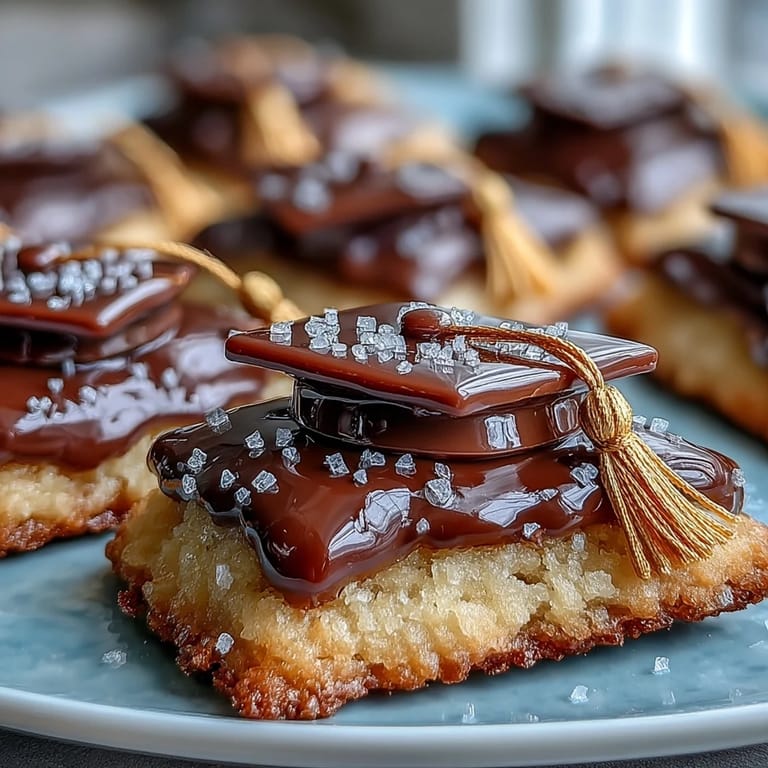
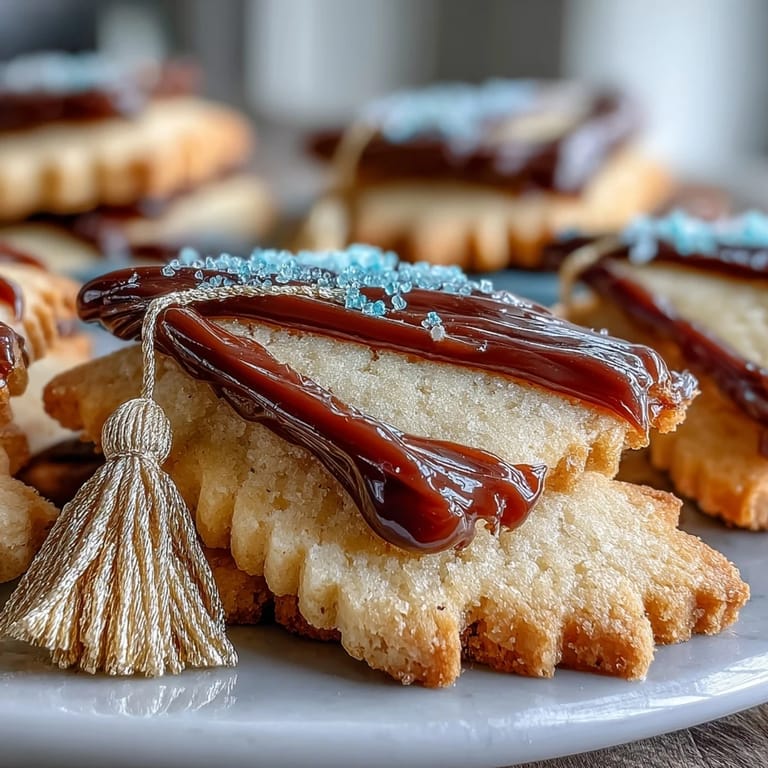
 The gentle clatter of whisk against bowl was the soundtrack to one of those afternoons where the kitchen became my celebration headquarters. A friend once joked that graduation season had my apron working overtime, but there's something irresistible about shaping cookies into tiny diplomas and caps, then coaxing ribbons of gold icing onto flour-dusted counters. With every swirl of royal icing, the air started to hum—not with nerves, but anticipation for a well-earned milestone. As the scent of buttery sugar cookies drifted through the open window, I wondered why we don’t crown life’s little victories with cookies more often. The ritual of decorating, bit by bit, felt like its own quiet tribute.
It’s fun to bring these cookies to graduation parties and watch guests puzzle over which design to eat first—some sneak the caps, others gravitate to the scrolls edged in shimmering gold. My niece once insisted on helping with the gold luster, her steady hand turning tassels into delicate works of art while we both giggled at our unglamorous, gold-dusted fingers. There’s always someone drawn to the decorating table, curious and eager to dab a bit of gold here or smooth a wobbly ribbon there. These cookies have a way of breaking the ice, creating little moments between the baking trays and piping bags. It’s the laughter and admiration over each unique cookie that always stick with me long after the party winds down.
Ingredients
- All-purpose flour: The backbone for sturdy cookies—sift it first for a smooth, crack-free cutout.
- Unsalted butter: Room temperature is key here to ensure you get that soft, melt-in-your-mouth texture.
- Granulated sugar: Cream this until fluffy; it sets up the tenderness, but don’t rush this step.
- Large egg: The magic that binds the dough harmoniously for perfect rolling.
- Pure vanilla extract: The aroma will fill your kitchen and linger even after the cookies cool.
- Almond extract (optional): Adds a subtle, celebratory note, or swap for lemon if you want a zesty twist.
- Salt: Just enough to sharpen the sweet profile—don’t skip it.
- Powdered sugar: Sift again for pillowy royal icing with no lumps.
- Egg whites (or meringue powder): For stable icing that pipes like a dream.
- Cream of tartar: This is your insurance policy for stiff, shiny peaks in the icing.
- Black gel food coloring: For inky, crisp graduation caps—start with a little, as it goes a long way.
- Gold edible luster dust & clear alcohol: The finishing touch; combine only as much as you’ll use right away for the boldest shimmer.
Tired of Takeout? 🥡
Get 10 meals you can make faster than delivery arrives. Seriously.
One email. No spam. Unsubscribe anytime.
Instructions
- Cream the base:
- Beat butter and sugar in your largest bowl until the mixture is almost cloud-like and light in color. Add egg and extracts, and watch as the aroma instantly invites a curious audience to the kitchen doorway.
- Bring the dough together:
- Blend in flour and salt gradually—switch to a spatula if needed—until the dough feels soft but holds shape. Knead just a couple of times with floured hands, then shape into discs, wrap, and chill to help them roll out smoothly later.
- Prepare to bake:
- While the dough chills, preheat your oven to 350 F and line sheets with parchment for an easy, lift-off later. This is also a great chance to clear a decorating station on the countertop.
- Roll and cut:
- Dust your rolling pin and surface generously, roll dough to 1/4 inch thick, then use cookie cutters to stamp out caps and diplomas. Don’t worry about perfect shapes—unique edges bake up just as delicious.
- Bake golden and cool:
- Arrange cookies an inch apart, bake just until the bottoms whisper golden (about 8-10 minutes), and transfer to wire racks where the warm, sweet fragrance fills the air. Avoid overbaking to keep that tender bite.
- Whip up royal icing:
- Beat egg whites until frothy, then slowly incorporate powdered sugar and cream of tartar. Once it's shiny and peaks form, stir in vanilla and divide—tint some black, keep some white, and reserve a bit for the gold accents.
- Create edible art:
- Pipe outlines, fill the cookies, and add details as you go—don’t be afraid to improvise with designs. Allow the decorated cookies to set out and dry for at least an hour before moving to the final step.
- Add the finishing gold:
- Mix a small amount of luster dust with clear alcohol or lemon extract to make a paint, then use a fine brush to highlight tassels and ribbons. Once satisfied, leave cookies undisturbed until completely dry and ready to dazzle on your serving tray.
 Save to Pinterest
 The day these cookies starred at my cousin’s graduation, her former teachers each picked a cookie matching their own cap’s color, holding them up with proud, joking toasts. Someone whispered that the gold was too pretty to eat, but by the end of the night, the platter was bare—save for crumbly evidence of celebration. For a moment, the cookies weren’t just dessert, but little trophies for a room brimming with pride. I still remember the sweet, slightly almond air as the house buzzed with excitement. Ever since, this recipe feels like baking joy into every milestone.
Mastering Cookie Decorating at Home
Give yourself grace if your first cookie design looks more like abstract art than diploma—perfection isn’t the goal here. Play around with icing consistency until it flows smoothly yet holds its lines; you’ll find your rhythm after a few tries. I’ve found piping bags with fine tips to be a game-changer for neat outlines and tassels. Take your time—cookies don’t mind waiting, but a rushed hand leaves you with a wobbly ribbon or a drippy edge. Embrace tiny imperfections as proof each cookie is truly homemade.
Getting the Most from Edible Gold
There’s a bit of magic in painting gold luster dust: a droplet too much liquid will thin out the shine, but too little and it clumps. Always mix your gold paint fresh, just before decorating, and use a light touch with a fine food-safe brush. Dab away excess for bolder accents and let sections dry before moving on to prevent smudging. You’ll know you nailed it when the caps and tassels glint in the afternoon light. If unsure, start with accents around the edges, then build confidence before painting bolder highlights.
Troubleshooting: Getting the Texture Right
If your dough feels sticky despite chilling, dust with a bit of flour and try rolling between parchment sheets—this keeps the cookies tender. If royal icing is too runny, add powdered sugar a spoonful at a time; if it’s too stiff, a drop of water does wonders. Remember that even the prettiest cookies need time to dry, so patience is your quiet sous chef here.
- If your first batch overbakes, lower the time and watch closely next round.
- Always sift powdered sugar for super smooth icing.
- Gold may rub off if packaged before fully dry, so give extra time before storing or transporting.
 Save to Pinterest
 However you decorate them, sharing these cookies feels like handing out little medals of accomplishment. I hope your kitchen fills with the same spirit of joy and achievement—one batch at a time.
Recipe FAQs
- → Can I use meringue powder instead of raw egg whites?
Yes. Substitute the two egg whites with 4 tablespoons meringue powder plus 6 tablespoons water to make royal icing that is safe for longer holding and easier to stabilize.
- → How do I keep cookie shapes from spreading?
Chill the dough thoroughly before rolling, roll to a consistent 1/4-inch thickness, and chill cut shapes on the baking sheet briefly before baking to minimize spread and retain sharp edges.
- → What consistency should royal icing be for flooding?
Flooding icing should be pourable but not runny; aim for a ribbon that sinks back into the surface in 10–15 seconds. Use thick piping icing for outlines and details, and slightly thinner for flooding.
- → How do I get a smooth black icing without graininess?
Use gel food coloring for intense color without thinning the icing. Add color gradually and beat well to remove streaks; let tinted icing rest briefly to eliminate air bubbles before piping.
- → What's the best way to apply edible gold luster?
Mix gold luster dust with a few drops of clear food-grade alcohol or lemon extract to make a paint. Use a fine food-safe brush to add accents to tassels and ribbons once the icing is set but still slightly tacky for better adhesion.
- → How should finished cookies be stored?
Store completely dry cookies in an airtight container at room temperature for up to one week. Layer with parchment to prevent sticking and avoid humid storage that can soften royal icing.