 Save to Pinterest
 There's something almost meditative about standing at the kitchen counter with a sharp knife and a pile of orange peels, knowing that in a few hours they'll transform into something that tastes like candied sunshine wrapped in dark chocolate. My grandmother used to make these every winter, and I'd watch the peels slowly turn glossy and translucent in the simmering syrup, the whole kitchen filling with this bittersweet citrus warmth. The first time I tried making them myself, I rushed through the blanching steps and ended up with peels so bitter I nearly threw the batch away—until she gently reminded me that patience with the water changes was the real secret. Now, whenever I make a batch, it's both a meditation and a small rebellion against store-bought candies that taste like nothing.
I made these once while my partner was working from home, and by hour two, he emerged from his desk looking slightly bewildered by how the entire apartment smelled like an upscale patisserie. When he saw the finished pieces lined up like little jewels on parchment paper, he asked if we were actually opening a chocolate shop, and I let him dip exactly three into the melted chocolate himself before declaring the rest were spoken for. That small moment—watching someone who usually doesn't bake get genuinely excited about the process—made me realize why I keep coming back to this recipe.
Ingredients
- 4 large organic oranges: The quality here truly matters because you're eating the peel, so those pesticide residues matter too; organic makes a real difference in flavor and safety.
- 2 cups (400 g) granulated sugar: This is your primary tool for transforming bitter peel into something tender and sweet, and the amount is carefully balanced so the syrup doesn't crystallize.
- 1 cup (240 ml) water: This dissolves the sugar and becomes the gentle bath that softens the peels over time.
- 7 oz (200 g) high-quality dark chocolate (70% cocoa or higher): Don't skimp here—the chocolate is your final statement, and a good 70% cocoa will let the bright citrus shine through without overwhelming it.
- Extra granulated sugar, for coating (optional): This adds a sparkle and extra crunch that catches light beautifully, though it's entirely your call whether you want that final textural layer.
Tired of Takeout? 🥡
Get 10 meals you can make faster than delivery arrives. Seriously.
One email. No spam. Unsubscribe anytime.
Instructions
- Prepare your oranges:
- Wash and dry them thoroughly under running water, rubbing gently to remove any surface dust. Using a sharp knife, score the peel into quarters from top to bottom, then gently peel away the skin, trying to keep as much of that white pith attached as possible—it softens beautifully during cooking and adds body to the final texture.
- Cut the peels into ribbons:
- Slice each piece lengthwise into 1/4-inch strips, aiming for consistency so they cook evenly. This is where your knife skills matter a little, but don't stress about perfection—some variation in thickness actually makes them more interesting.
- Blanch away the bitterness:
- Place all your strips in a saucepan, cover with cold water, and bring to a boil, then drain and discard the water. Repeat this process two more times with fresh water each time—this is genuinely crucial because each blanch pulls out more of that harsh, astringent flavor that raw citrus peel carries.
- Build your syrup:
- In a clean saucepan, combine 2 cups sugar and 1 cup water, then set over medium heat and stir gently until the sugar dissolves completely. Once it's clear and liquid, you're ready to add the peels—don't let it color or caramelize, which would change the candy's texture.
- Simmer gently into translucence:
- Add your blanched peels to the syrup and reduce heat to low, letting them simmer for 45 to 60 minutes while you stir them occasionally. You'll watch them gradually become tender and slightly glossy, turning from opaque to almost translucent as they absorb the syrup and soften—this is meditation in a saucepan.
- Dry them to the perfect texture:
- Using tongs or a slotted spoon, carefully transfer the peels to a wire rack set over parchment paper and let them sit undisturbed for at least an hour. They'll continue to dry and firm up as they cool, losing that sticky quality but retaining the lovely candied chew you're after.
- Sugar coat if you're feeling it:
- If you want that extra sparkle and crunch, toss the cooled peels in a bowl of extra granulated sugar, making sure each piece gets a light coating. This step is entirely optional but adds a beautiful textural contrast and catches the light like little edible gems.
- Melt your chocolate carefully:
- Set a heatproof bowl over a saucepan of barely simmering water (making sure the bowl doesn't touch the water), add your chocolate broken into pieces, and stir gently until completely smooth. The gentle heat prevents the chocolate from seizing or becoming grainy, and you'll feel the transformation as it goes from solid to silky.
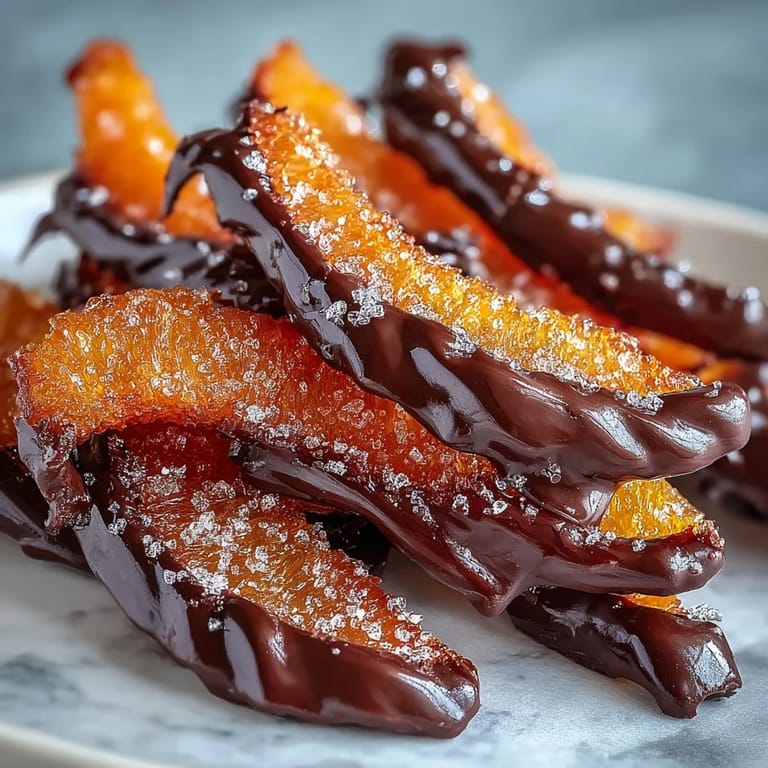
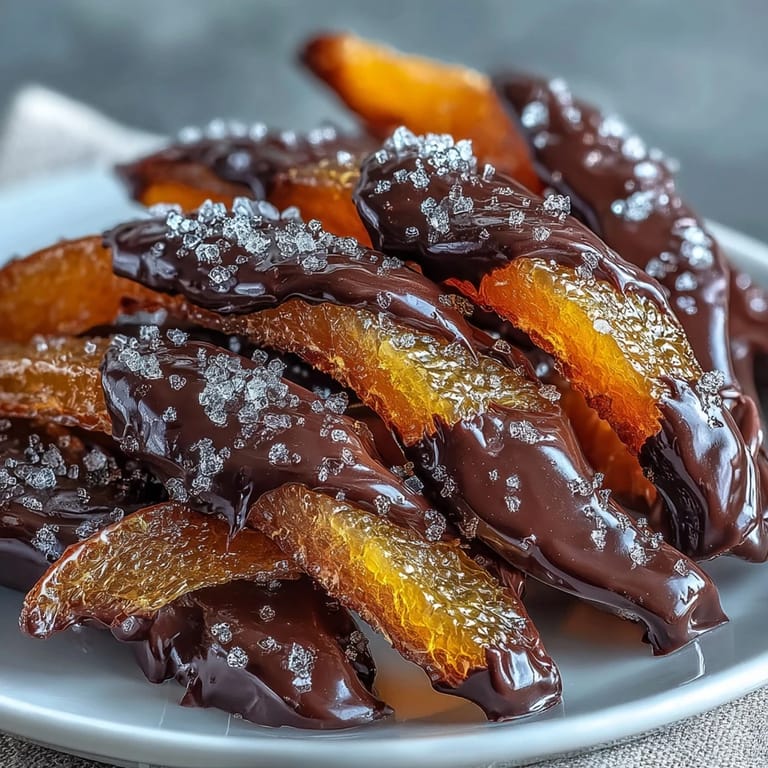
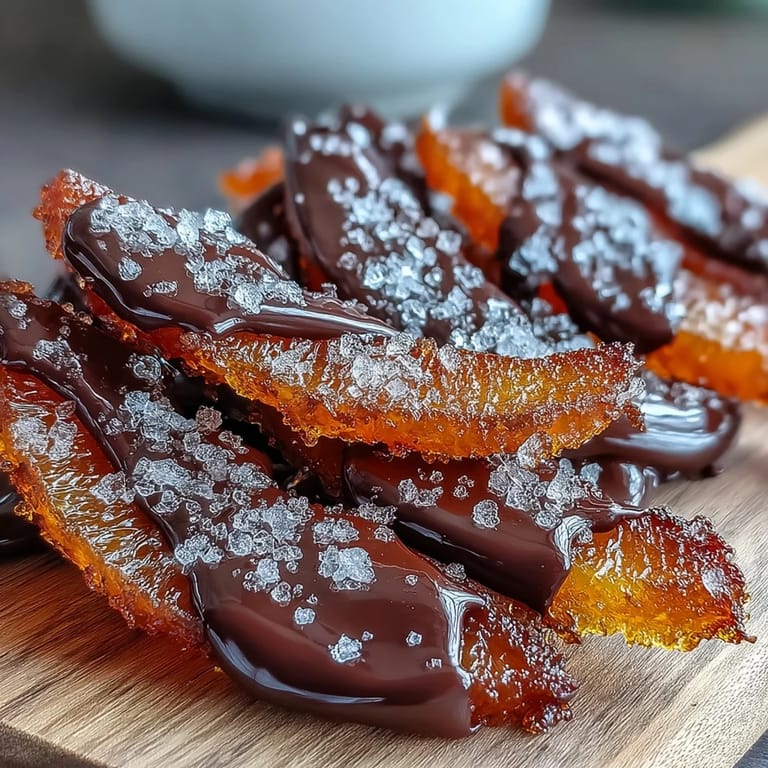
- Dip with intention:
- Hold each candied peel by the uncoated end and dip about halfway into the melted chocolate, letting the excess drip off back into the bowl for a clean finish. Place each piece on fresh parchment paper and try to resist moving them around before the chocolate sets.
- Let them set and settle:
- Allow the chocolate to harden completely, which takes about 30 minutes at room temperature or 10 minutes in the refrigerator if you're impatient. Once set, they're ready to enjoy immediately or store for later, and the anticipation of that first bite is genuinely part of the charm.
 Save to Pinterest
 There was an afternoon when a friend came over during the final drying stage, and she picked up a piece of candied peel without asking, expecting it to be sticky and messy. Instead, she found it had that perfect chewy-firm texture, and the surprise and delight on her face made me understand why these little candies feel more special than their simplicity suggests. Food moments like that—when someone tastes what you've made and it exceeds their expectations—remind me why I keep recipes like this close.
On Blanching and Why It Matters
The blanching process feels tedious when you're doing it, but it's genuinely the difference between candied orange peel that tastes like a luxury confection and candied orange peel that tastes like a gimmick. Each time you boil and drain the peels, you're leeching out the compounds that make raw citrus peel so intensely bitter—limonene and other bitter alkaloids that sugar alone can't mask. I once tried to save time by doing only one blanch, convinced I was being efficient, and the result was candies that made me wince even though they looked beautiful.
Chocolate Selection and Dipping Technique
The chocolate you choose is genuinely your final statement about these candies, so it's worth taking a moment to think about it. A dark chocolate around 70% cocoa feels like the ideal balance—dark enough to feel sophisticated and complement the bright citrus without being so intense that it overwhelms the delicate peel underneath. When you're dipping, the angle and speed matter slightly; a smooth, confident motion in and out prevents the chocolate from pooling at the bottom, and letting the excess drip back into the bowl gives you those clean, professional-looking edges that make people assume you attended culinary school.
Flavor Variations and Storage Wisdom
If you want to get creative, the syrup is genuinely your playground—a cinnamon stick or a few whole cloves simmered along with the peels adds unexpected warmth and spice that plays beautifully with the chocolate. For storage, keep these in an airtight container at room temperature and they'll stay delicious for two weeks, though honestly they rarely last that long in a house where people know what they are.
- Add spices to your syrup if you're feeling adventurous, but always remove them before the peels dry so they don't interfere with the coating.
- If you want to gift these and aren't sure about allergies, always check your chocolate label for traces of soy, nuts, or milk because those warnings exist for real reasons.
- Make these when you have a quiet hour or two, because rushing through the process shows in the final texture in ways you'll notice and regret.
 Save to Pinterest
 These candied orange peels feel like the kind of thing only fancy pastry chefs make, but they're genuinely within reach for anyone with patience and a decent knife. The real magic isn't in complexity—it's in taking time to transform something bitter into something beautiful, which might be the entire point of cooking in the first place.
Recipe FAQs
- → How do I reduce bitterness in orange peel?
Blanch the orange peel by boiling and draining it three times. This process rinses away excess bitterness from the pith, resulting in a sweeter final product.
- → What’s the best chocolate for coating?
Choose a high-quality dark chocolate with 70% cocoa or higher for a rich, balanced flavor that complements the citrus notes.
- → Can the candied peels be stored?
Store them in an airtight container at room temperature for up to two weeks to maintain freshness and texture.
- → How long should I dry the peels before coating?
Let the candied strips dry for at least one hour until they're no longer sticky, ensuring the chocolate adheres evenly.
- → Can I add spices during candying?
Yes, adding cinnamon sticks or cloves during simmering enhances flavor; just remove them before drying.